Oculus Quest 2 Wireless PC VR Setup
I consider myself a moderate VR enthusiast. I’ve been an owner of an Oculus Rift for a couple of years, and recently I got an Oculus Quest 2. It is an interesting device, which is completely standalone with inside-out tracking. You can put it on and play anywhere you’d like without a gaming PC nor base stations. It even has some features like hand tracking that’s quite impressive. That being said, I found its ability to wirelessly stream games from PC to be the most intriguing, because I purchased most of my games on Steam! In this post, let’s explore a few different ways to play PC VR games wirelessly on the Quest 2 and their quirks. In particular, using a WiFi 6 hotspot to minimize network latency.


Why Are You Doing This?
As I mentioned, I am an Oculus Rift owner and I purchased most of my games on Steam. Without streaming from PC, Oculus Quest 2 can only play its native games that you purchased from the Oculus Store. Aside from that, some games and apps are only available on PC or Steam. Games like BeatSaber are much more fun with mods, which you can’t install on Quest 2. Additionally, perhaps you enjoy more graphical eye candies on PC. Furthermore, I consider games like Gorn to be practically unplayable on Oculus Rift, due to the fact that the Rift has only 2 base stations, which means it will lose tracking if you turned around. Of course, you will also get tangled up with wire if you turn too much. Having a room-scale wireless solution is a game changer for many games.
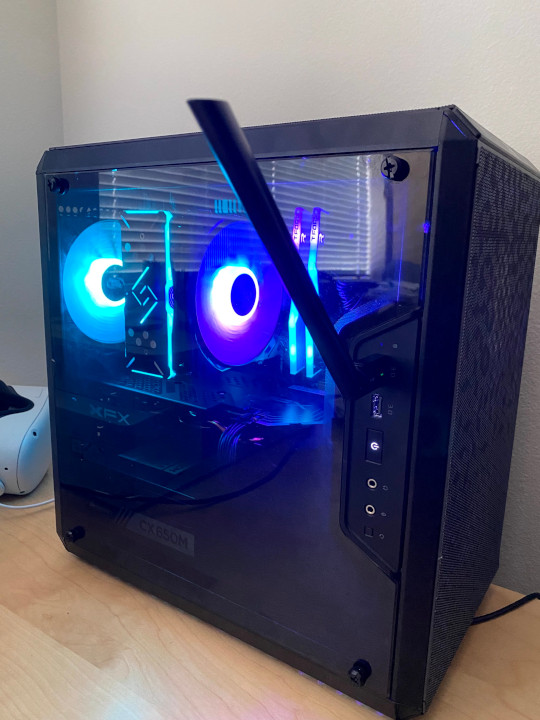
Hardware
I have a 256GB Oculus Quest 2, which is exactly the same as its 64GB base model aside from storage capacity. For its specs, I’m just gonna link its Wikipedia page. Though a little off-topic, I want to mention that compared to the Oculus Rift, I can immediately notice its sharper resolution but lower contrast due to its LCD panel. Also, the fact that I can turn around without getting tangled with wire is liberating. My PC is quite modest by today’s standard. However given the on-going chip shortage and outrageous GPU prices, I believe many PC gamers are still rocking similar specs. Keep in mind that all of my experiences were captured on a relatively low-tier PC. Your experiences will vary if you got your hands on a newer GPU.
| Component | Part name |
|---|---|
| CPU | AMD Ryzen 5 3600 |
| GPU | AMD Radeon RX 580 4GB |
| RAM | 16GB (2 x 8GB) DDR4 3200Mhz |
| Storage | ADATA XPG SX8200 Pro 512GB NVMe Gen3x4 |
| WiFi 1 | ZYT 3000Mbps PCIe Wifi Card with Intel WiFi 6 AX200 chipset |
| WiFi 2 | TP-Link AC600 USB WiFi Adapter |
Notice that I have two WiFi adapters. An internal PCIe WiFi 6 (ax) adapter and an external USB WiFi 5 (ac) adapter. I will explain why I got two later. The only reason why I got this particular no-name WiFi 6 card is that I wanted to make sure it will work with Linux. I use Arch Linux as my main desktop OS, so Linux compatibility is a requirement. After some Googling, I learned that as of writing only the Intel AX200 chipset is compatible with Linux. Other chipsets don’t seem to work with Linux at all. After some more research, I found a few WiFi 6 cards that use the Intel AX200 chipset, but only this one explicitly states its chipset and the fact that it’s Linux compatible in its Amazon listing. So I bought it. I can testify that it indeed works with both Linux and Windows 10 flawlessly. Just plug in and play, no driver installation required on both. Another thing that’s worth mentioning is that my home router is a Google OnHub with WiFi 5.
Air Link vs Virtual Desktop
As for software, Oculus recently released Air Link as a Beta feature. You have to enable it on both your Oculus Quest 2 as well as Oculus software on PC. Somehow on the Quest 2, it will remember that you’ve enabled it, but on PC side you have to go into its settings and enable it every boot. Alternatively, you can also use Virtual Desktop. You just need to run its desktop streamer on your PC and you can play both Oculus and Steam games. For both Air Link and Virtual Desktop, I went with their default settings.
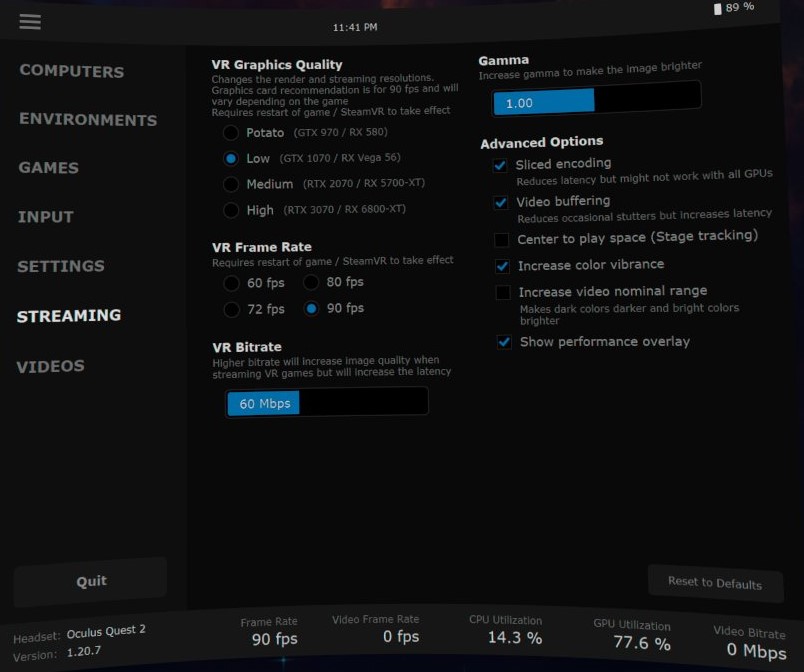
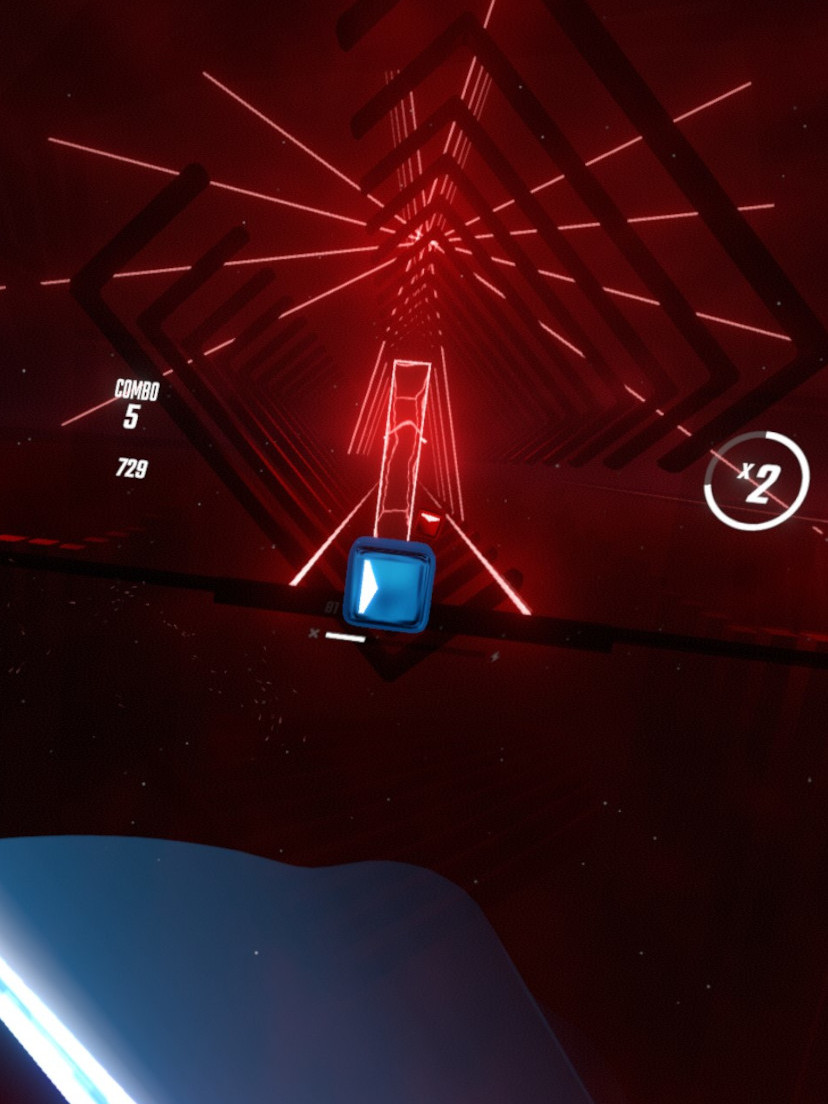
Something very important to mention here is that my GPU is really not great. Virtual Desktop literally thinks it’s a Potato, but I choose to use “Low” quality anyways, because I refuse to accept “Potato”. On the Air Link side, there isn’t a lot of settings to choose from, but you can see that my bitrate is capped at 100 Mbps. This is currently a known issue for AMD GPU and documented by Air Link. If you have an Nvidia GPU, the cap is 200 Mbps. Reddit users speculate this is due to AMD GPU’s poorer encoder performance, especially on older GPUs. For me, Virtual Desktop offers significantly better visuals than Air Link. On Air Link, I can notice significant delays and compression artifacts. However, this experience doesn’t seem to be the consensus. So if you have a better GPU, you will likely have different opinions. As for me, I’m gonna stick with Virtual Desktop going forward, especially because it offers a nice performance overlay, which makes it easier to see in-game metrics.
WiFi 6 Hotspot Connection
Oculus Quest 2 is equipped with a WiFi 6 (ax) antenna, which in theory offers much higher bandwidth than WiFi 5 (ac). However, it should have no difference in terms of latency. The recommended way to connect the Quest 2 to PC is to get a WiFi 6 router, that connects to your PC using ethernet and connects to your Quest 2 using WiFi 6. Unfortunately, this solution is a no-go for me, because my router is downstairs and I don’t have an ethernet connection between my PC and router. My PC is connected to my router through WiFi 5. One thing that worried me is whether network latency will cause additional motion sickness when streaming VR gameplay. I’m happy to report that this is not an issue in most cases, because it seems like the headset is compensating for head movements in both Air Link as well as Virtual Desktop. ie. If a frame is delayed, the headset will simply shift the previous frame depending on your head movement. Of course, if latency is too high, this becomes noticeable and dark background will be visible. In most cases, this is not an issue and greatly helps with motion sickness. The easiest way to notice latency is to pay attention to input lag, which cannot be compensated easily. For instance, in BeatSaber, you can feel your sabers feel wobbly. I was inspired by this YouTube video that showed me how to use a WiFi 6 hotspot to establish a direct connection between a PC and a Quest 2. In theory, this should produce the absolute minimum latency.

However, my setup has a key difference. In this video, their PC is connected to the internet through ethernet while WiFi 6 card is used to create a hotspot between itself and the Quest 2. In my case, I don’t have an ethernet connection, which makes the whole thing much more complicated. Here is how I did mine.
Step 1: Creating a WiFi 6 Hotspot
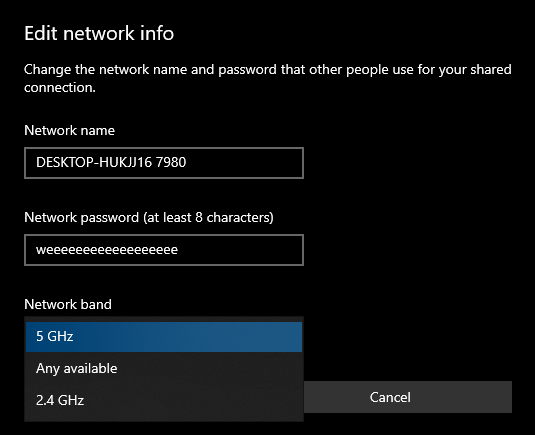
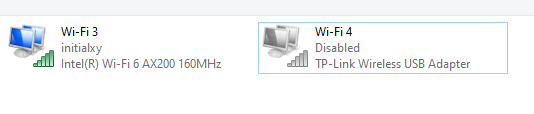
First, go to Windows 10’s Network Connections and take a note of your WiFi 6 adapter’s name. In my case, it is named “Wifi 3” and that’s what I will refer to it going forward. You may be tempted to just go to Mobile hotspot in Settings and turn it on. Unfortunately, there are some quirks. In the above video, they mentioned that there seems to be a bug with the Intel AX200 chipset such that your WiFi 6 connection with your Quest 2 doesn’t get full bandwidth until you connect your phone to your hotspot first. I did not experience this issue. Reddit users speculate this is due to the hotspot defaulting to 2.4 GHz. So I forced my hotspot to use 5 GHz. I’m not sure if that helped or if the bug was fixed.
I was able to get a 1200 Mbps connection with my Quest 2, and that should be the maximum bandwidth supported by Quest 2. There’s another issue that was mentioned in the above video. When hotspot is connected, Windows continues to scan for WiFi SSIDs once in a while. When it happens, it will massively choke your VR experience up to several seconds like this.

To deal with this issue, you need to turn off WiFi scanning. However, when it’s turned off, your WiFi adapter will no longer be able to connect to your router nor hotspot. So you need to turn it on, start a hotspot, then turn it off. The above video linked a PowerShell script provided by a Reddit user to perform these steps. Here are the important bits. Note that “Wifi 3” needs to be replaced by your WiFi 6 adapter’s name.
$connectionProfile = [Windows.Networking.Connectivity.NetworkInformation,Windows.Networking.Connectivity,ContentType=WindowsRuntime]::GetInternetConnectionProfile()
$tetheringManager = [Windows.Networking.NetworkOperators.NetworkOperatorTetheringManager,Windows.Networking.NetworkOperators,ContentType=WindowsRuntime]::CreateFromConnectionProfile($connectionProfile)

# Enable Scan (need it to enable HotSpot). Change "Wi-Fi 3" to your adapter name
Start-Sleep -Seconds 2
netsh wlan set autoconfig enabled=yes interface="Wi-Fi 3"

# Start Mobile Hotspot
$tetheringManager.StartTetheringAsync()
Start-Sleep -Seconds 2

# Disable Scan (need it to remove latency when Windows do a scheduled network scan). Change "Wi-Fi 3" to your adapter name
netsh wlan set autoconfig enabled=no interface="Wi-Fi 3"
Save this script as a PowerShell script. eg. start_hotspot.ps1. You will need to run this script in PowerShell with Administrator privilege. However, when you do, it will tell you that running scripts is disabled on this system. You will need to lower your Execution Policy’s security level. Of course, you probably don’t want to do that. In that case, you will need to run
powershell -ExecutionPolicy Bypass -File .\start_hotspot.ps1
That will allow you to bypass the execution policy just for that one instance. When you are done with your VR session, remember to turn it back on with
netsh wlan set autoconfig enabled=yes interface="Wi-Fi 3"
Consider saving it as another script. eg. enable_wifi_scan.ps1. Once your Quest 2 is connected to your hotspot, it will not have access to the internet (unless, of course, you have ethernet). Interestingly Air Link will not work without an internet connection. But Virtual Desktop will work. So open up Virtual Desktop Streamer on your PC and you can play games offline. At this point, your Quest 2 will attempt to drop from your hotspot and reconnect with your router to acquire an internet connection. You could “forget” your router’s SSID to mitigate this.
Step 2: Acquiring Internet Connection
Like I mentioned earlier, if you have an ethernet connection, then you are done. You can skip the rest of this post. But if you are like me, who don’t have a physical line to your router, then read on. Since I can only connect to my router with WiFi, I bought a second external USB WiFi 5 adapter and plugged it into my PC’s front IO.
My intention is obvious. I want to use my WiFi 6 adapter for hotspot with my Quest 2 and WiFi 5 adapter for internet connection. Unfortunately, Windows 10 makes this very difficult, because it’s not obvious which adapter is being used for what. So here is what you gotta do:
-
Open Network Connections and disable your external adapter. In my case, it’s named “Wi-Fi 4”.
- Use the above script to start a hotspot. At this point, your hotspot should be started on your WiFi 6 adapter.
- Now enable your external adapter, and connect it to the internet.
-
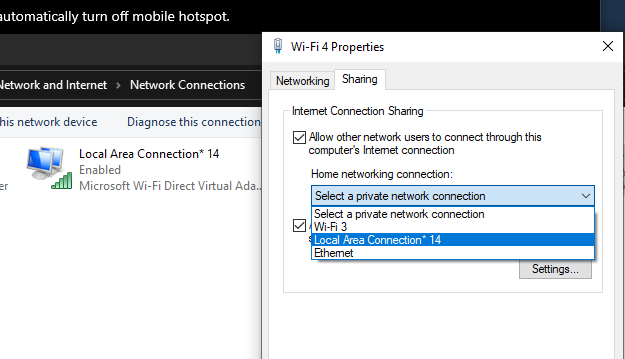
You only have to do this step once. Share your external adapter to your hotspot connection. In my case, my hotspot connection is called “Local Area Connection* 14”
- Finally, connect your Quest 2 to your hotspot. Behold! Now your Quest 2 is connected to your PC through a WiFi 6 hotspot at 1200 Mbps and it also has an internet connection. Try Air Link, it will finally work. I can verify that Air Link traffic is definitely going through the hotspot by checking network traffic volume through each adapter. I also checked my router’s monitor to further verify. I don’t know why Air Link needs internet connection. Perhaps it’s needed to search for your devices. Enjoy!

Performance Comparison
Naturally, you may have some questions at this point. Does it actually perform well? Is it playable? Do I really need WiFi 6 for this? How bad is it if I just connect it to my router? Let’s explore these and find out. TLDR: Yes it is playable. In fact, I believe the experience is comparable to the Oculus Rift, despite some quirks. Now let’s look at some numbers. I used Virtual Desktop’s performance overlay to capture performance metrics while playing BeatSaber. While it’s not a scientific experiment, the numbers are actually quite consistent overall and helped paint a picture of what we are looking at. Let’s dive in and take a look at these numbers. Screenshots are captured in the order of WiFi 6 hotspot, WiFi 5 hotspot, and WiFi 5 router.
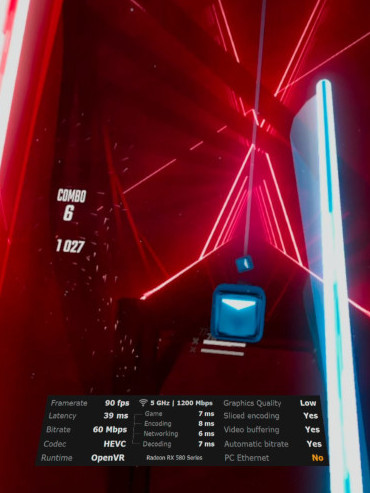

| WiFi 6 Hotspot | WiFi 5 Hotspot | WiFi 5 Router | |
|---|---|---|---|
| Network Latency | 5 to 7 ms | 7 to 9 ms | 13 to 15 ms |
| Total Latency | 37 to 39 ms | 39 to 42 ms | 49 to 51 ms |
| Bitrate | 60 Mbps | 28 Mbps | 36 Mbps |
| Frame Rate | 90 fps | 90 fps | 90 fps |
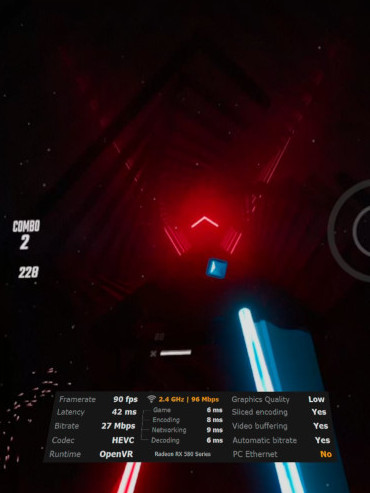
| Bandwidth | 1200 Mbps | 96 Mbps | 866 Mbps |
| Notes | Stutter if far | Stutter if far | Occasional stutter |
Keep in mind that I have a low-tier GPU. Virtual Desktop is running in low-quality setting, automatic bitrate, and 90 fps cap. As expected, WiFi 6 hotspot delivered the best numbers across the board. However in both hotspot setups, while experience is pretty smooth, if I moved to another room, there will be significant stutters, making them unplayable. WiFi receivers don’t have strong output signal strength after all. What’s interesting to note is that the WiFi 5 hotspot could only deliver 96 Mbps bandwidth. Unlike WiFi 6, there was no setting in Windows 10 that allowed me to lock its frequency band to 5 GHz. I’m not sure why bandwidth is so low and I didn’t find any way to increase it. Consequently, bitrate was a mere 27 Mbps, which made compression artifacts easily visible. Network latency was also consistently higher than WiFi 6 hotspot, though only by a couple of ms. WiFi 6 was not supposed to improve latency on theory. When both my Quest 2 and PC are connected to my WiFi 5 router downstairs wirelessly, network latency was significantly higher, due to the round trip to my router. Usually at just below 15 ms. Compression artifacts are visible if you move quickly, and it randomly stutters from time to time. However, I’d still consider this setup playable as long as you are not playing highly timing-sensitive games like BeatSaber. In BeatSaber, it feels like your sabers are slightly wabbly due to the added latency. Though head movement still feels smooth enough that it doesn’t cause motion sickness for me due to movement compensation on the headset. As a rule of thumb, I’d still choose to connect to a WiFi 5 router when playing less intense games due to its convenience and the fact that I could play anywhere in my house (where my office space is pretty limited). But for high-intensity games, I’d use a WiFi 6 hotspot. WiFi 5 hotspot is tolerable if you don’t want to buy a WiFi 6 card, but be prepared to see compression artifacts everywhere. I’m sure overall latency can be improved if I had a newer GPU, considering the fact that older AMD GPU is known to have poor encoder performance. Reddit users were able to push frame rate to 120 fps at 150 Mbps with Air Link, which should produce much better experiences. However, the GPU market isn’t so kind at the moment. With all that in mind, if a game offers a Quest 2 native version, I’d still consider picking it up, as long as mods and cost aren’t something of concern. Native games still win in crispness and responsiveness in most cases, which are more important than graphical flares in my opinion.
Quirks
Some interesting quirks that I found along the way:
- Google Earth refuses to launch in Air Link. It will show an error on the desktop about no headset detected. You get the same error when Oculus Rift is not connected directly to a dedicated GPU. However, it works when launched from Virtual Desktop. Fun fact, you could actually connect a Oculus Rift to your motherboard’s HDMI output and have your integrated GPU act as a passthrough. Why would anyone do that? Because my RX 580 has only one HDMI and my TV only has HDMI input. So if I wanted to connect my PC to my TV and Oculus Rift at the same time, I’m out of HDMI outputs. Of course, a better solution is to get a DisplayPort to HDMI dongle.
- Virtual Desktop asks you to always launch games from its menu instead. However, Project Wingman will always crash if you try to launch it from Virtual Desktop. You can still launch it from Steam and it works just fine. For some reason, Project Wingman doesn’t reset your position even when you try to reset it in the Quest 2 menu. So if you leaned in to launch it from your computer, make sure to sit still right away otherwise your head is gonna be outside of a plane and you can’t fix it.
- BeatSaber seems to experience occasional tracking issues. This is noticeable in both PC and native versions of BeatSaber. I did not find this issue while playong on my Oculus Rift. Reddit users suggested disabling guardian from debug tool. I simply drew a really large guardian range so it never shows up during gameplay. I feel that improved tracking issues a bit, but it could be a placebo. I believe this is just the limitation of inside-out tracking.