Building a Compact PC
I build PCs as a hobby, though I don’t go for the best and latest. I usually like to set a challenge for myself and try to accomplish that goal cost-effectively. I started with something really simple and basic, then incrementally upgrade my build piecemeal over time. So I always have something to do without creating a lot of waste or blow away all of my income. Inevitably, I eventually replaced enough parts of my build that my entire v1 of my build was sitting in my office as spare parts. It raises the question posed by Ship of Theseus, however, that is not the point of discussion for this blog entry. Since I had enough spare part to build a fully functional PC, I decided to reuse as many parts as possible to build a PC for my mom. Unfortunately, my mom has to take a flight to visit us, and she doesn’t want to bring a check-in luggage just for my PC. Fortunately, according to TSA, it is possible to place a desktop computer in carry-on luggage, as long as you take it for inspection like laptops. So for this project, I challenged myself to build the tiniest possible PC with generic parts, full desktop-class components. This blog entry is not meant to serve as a build guide, but rather to discuss some quirks that I did not or simply could not have anticipated ahead of time. The fact that everything fit together at all was quite a miracle in retrospect.
The Plan
My spare parts could be assembled to make a typical Micro-ATX build. However, that is obviously not convenient for travel. My original plan was to build a more typical Mini-ITX build with something like Cooler Master Elite 110 that could fit in check-in luggage. With this plan, I only need a new Mini-ITX motherboard and case. I could reuse my APU, RAM, SSD, and PSU. However, my mom did not want to bring a check-in luggage just for my PC. So I had to alter my plan. After some research, I decided to still stick with Mini-ITX form factor, because I wanted to reuse as many parts as possible. If I wanted to go smaller, then I’d have to find some specialized barebone solutions like Intel NUC, ASRock DeskMini A300 or Mini-STX. These solutions would force me to reuse even fewer parts. Though ASRock DeskMini A300 would probably end up being more cost-effective, it needed laptop class SO-DIMM memory. So I wanted to challenge myself to build the tiniest possible generic parts build without specialized parts. Here was my planed parts list.
| Component | Part name |
|---|---|
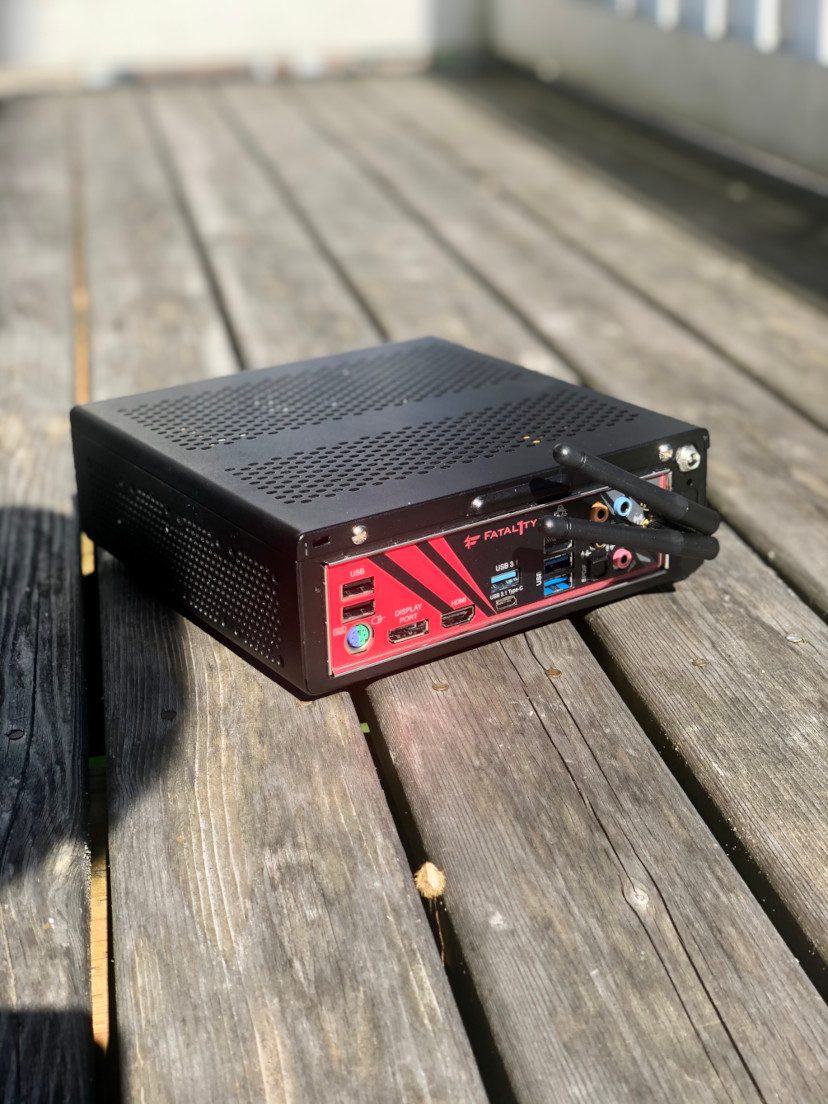
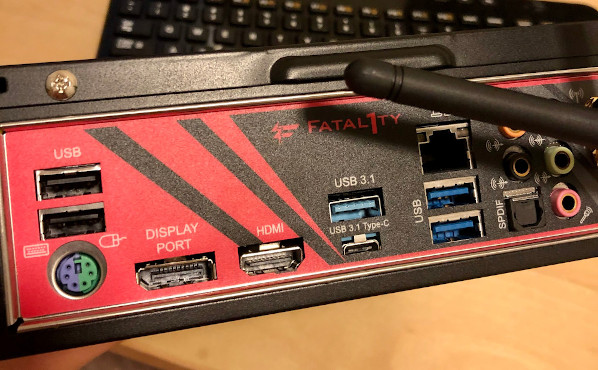
| Motherboard | ASRock Fatal1ty B450 GAMING-ITX/AC |
| APU (CPU + iGPU) | AMD Ryzen 5 2400G |
| CPU cooler | AMD A6 stock cooler |
| RAM | Ballistix Sport LT Gray DDR4-2400 2 x 8GB |
| Storage | Silicon Power S55 240GB 2.5” SATA III SSD |
| Case | Morex 557 Universal Mini-ITX Case |
| PSU | RGEEK 24pin 12V 250W Pico PSU + LEDwholesalers 12V 20A 240W AC/DC Power Adapter |
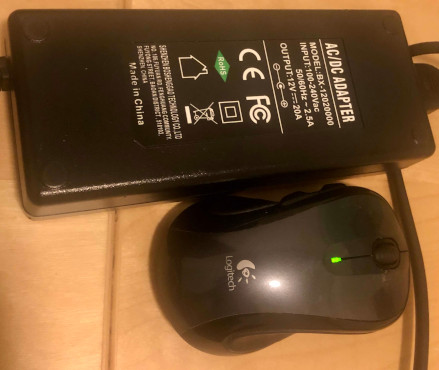
There are a couple of interesting things to note here. First is the PSU. Normally an ATX PSU would fit inside the case, or something extrude out a bit in case of a compact Mini-ITX case. However, the case I chose is pretty much the smallest Mini-ITX case I could find. It’s only a slim larger than the motherboard itself. It certainly cannot contain an ATX PSU. In fact, it is so small that the whole front panel had to be removed in order to put the motherboard in. So I had to use a pico PSU plus an external power AC-DC power adapter. Their performance is far poorer than an ATX PSU, at a mere 240W peak output. However looking at online reviews, Ryzen 5 2400G has a peak system power consumption of around 125W, so hopefully, their sustained power delivery should be enough. They are also much more expensive than a typical ATX PSU. Perhaps due to their niche market. I bought my spare ATX PSU for about $25 USD, while the pico PSU and power adapter cost about $60 USD.
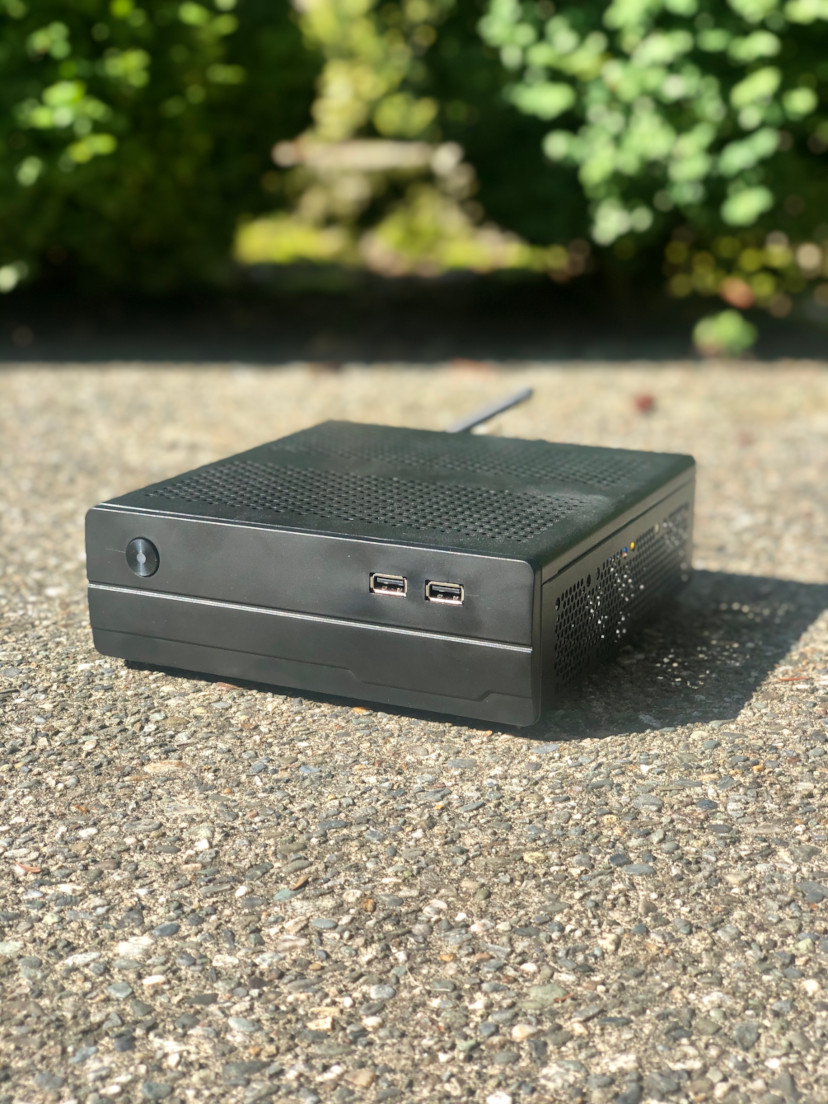
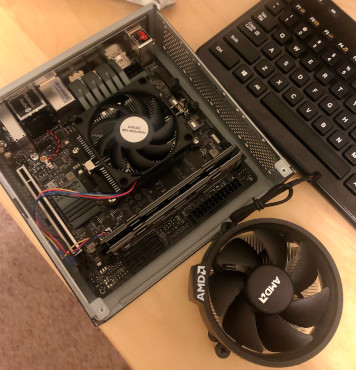
Second is the CPU cooler. The case I got, Morex 557, has the smallest dimension that I could find on Amazon for Mini-ITX form factor, at mere 195mm x 190mm x 62.46mm. However, I simply could not find its CPU cooler height clarence anywhere. A Youtube video seems to have fitted a Noctua NH-L9i low-profile CPU cooler inside. I decided to get the case first so I can measure it. I actually have three spare CPU coolers. Ryzen 5 2400G’s own stock cooler, Ryzen 5 3600’s stock cooler or AMD A6’s stock cooler. I got the last one from AMD’s bootkit for Ryzen 5 2400G. They instructed me to leave the cooler out when shipping the A6 back to them, so I ended up with a spare cooler. Once I got things ready, it became apparent that neither Ryzen 5’s coolers even stand a chance of fitting in there. However the A6 cooler barely fits, missing the top cover by just a couple of millimeters. I took a ruler to get some measurements. My rough measure seems to indicate that Morex 557 has about 45mm of CPU cooler clarence. The A6 cooler has a height of 40mm from the bottom of the heat sink to the top of the fan. However, its clamp extrudes a bit more. Its total height is about 43mm. Both the Ryzen 5 2400G and A6 are rated for 65W TDP, so I figured it should be able to survive. This was a lucky coincidence and saved me $40 USD from getting the Noctua. Again, this case is also more expensive than it looks, perhaps due to its niche market. It cost $50 USD, while my spare Micro-ATX case costs $15 USD.
The Build
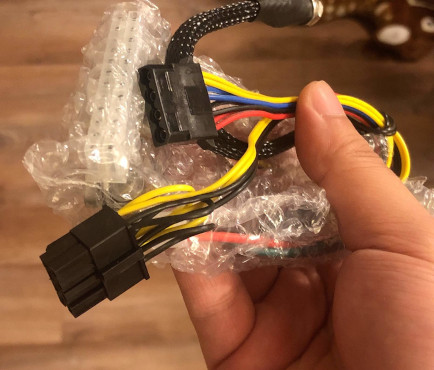
The actual build process was quite enjoyable for me. It only took about 3 hours to get everything into working condition. The Mini-ITX motherboard is pretty straightforward to work with. Desktop class CPU and RAM fit in just fine. I originally mistakenly plugged the CPU fan into case fan 1, but it still worked and I quickly noticed that once I tried to optimize my fan curve in UEFI settings. The pico PSU needs to be attached to the back of the case with an included bolt. It provides 12v 24 pins, 12v 8 pins, Molex and SATA adapters. One thing to note is that I had very little choice in PSU, as my motherboard required a 12v 8 pin CPU power adapter, and most pico PSU only provides a 4 pin. Everything plugs-in intuitively. The motherboard has an M.2 NVMe x4 slot for SSD at its back. However, I didn’t use it. Instead, I wanted to reuse my old 2.5” SATA III SSD. That became quite a tricky fit. I also overclocked my RAM to 2666Mhz with XMP profile 1, it works flawlessly.
The Quirks
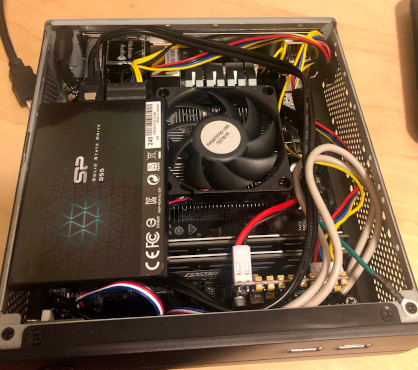
Even though I got everything working, it doesn’t mean I didn’t hit some weird obstacles that I didn’t anticipate. Let’s start with the SSD. I believe the case intended for 2.5” SSD to be mounted on a drive cage. But it also eats away just a couple millimeters in height. If I had installed it, it would have blocked half of my CPU cooler and there won’t be enough height left to install the actual SSD. So I just left it out. The SSD’s screw holes don’t align with the screw holes on the side of the case, so I just put in one screw to secure the SSD. At this point the SSD is sitting on top of my CPU cooler, blocking perhaps a couple of millimeters of the fan. I decided that is fine. However, the SSD is also just a tad too tall, which made the case difficult to close, though still possible if I pushed hard enough. I didn’t want it to push down on the CPU cooler on just one corner, which would put uneven mounting pressure on the CPU. So I took out a pair of scissors and just cut a hole in the SSD’s case. Needless to say, it voids the warranty, but now it fits!
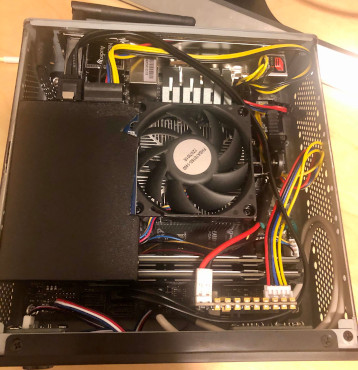
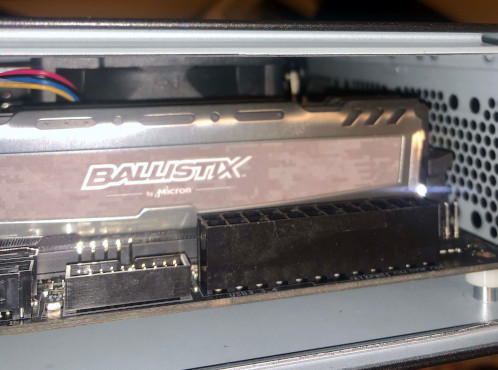
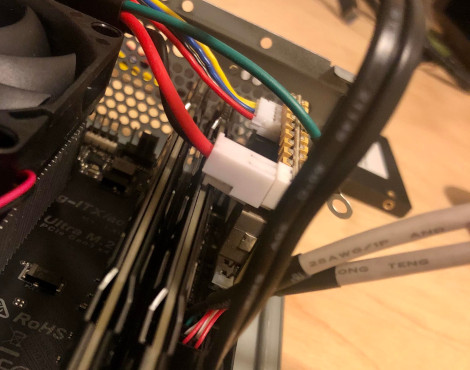
The pico PSU’s input power plug bumps into my RAM. In fact, my RAM is just a couple millimeters too tall, such that it was going to bend the PSU’s plug if I plugged it all the way in. So I carefully positioned it such that the plug’s clip handle sits right in between my RAM’s heat sinks, and I didn’t plug the 24 pins all the way down to prevent bending it, but still tight enough. It worked out just fine. Interestingly, there’s a one-star review on this pico PSU’s Amazon product page that claims the input plug is on the wrong side such that it bumps into the RAM. Looking at the product images of other pico PSU’s, it does seem like others would have the input plug on the other side. However, if that was the case, the input plug would have been obstructed by the front panel, making this build impossible. I definitely got lucky there and unknowingly bought the right product.
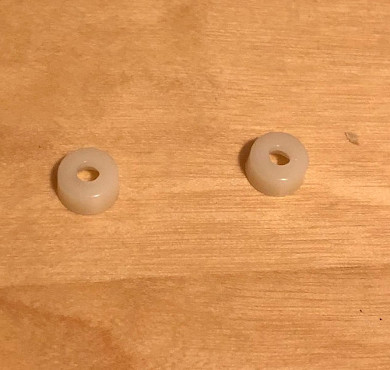
Once I finally assembled and tested by build, I noticed that all of the ports on the back of the case are just slightly misaligned. They all seem to be just a millimeter lower than the IO shield. The USB-C port is especially obstructed. That’s when I remembered that I removed a couple of plastic caps from the front motherboard stands. I thought there had no purpose. But I figured they were probably needed to lift the back motherboard stand a little. Note that the case didn’t come with instructions. So everything is just educated guesses. I had to remove my motherboard and put those in, now everything is perfectly aligned.
The pico PSU has a mysterious green wire with rings on top. It did not come with any instructions, so again, it’s up to my educated guesses. Google searching didn’t turn up with an immediate answer. So I found the instruction sheet of a different pico PSU that had the same green wire. It claims that’s an optional ground wire to reduce static shock. So I decided to screw it on the case, however, there were not a lot of options on the case to screw this wire, as it has very limited reach. If I screwed it on the top of the case, it would have obstructed the top cover of the case. So I ended up screwing it into a random hole at the bottom of the case. (In the SSD pictures above, you can see that I initially screwed it to the top of the front panel, then moved it down in the final build.)
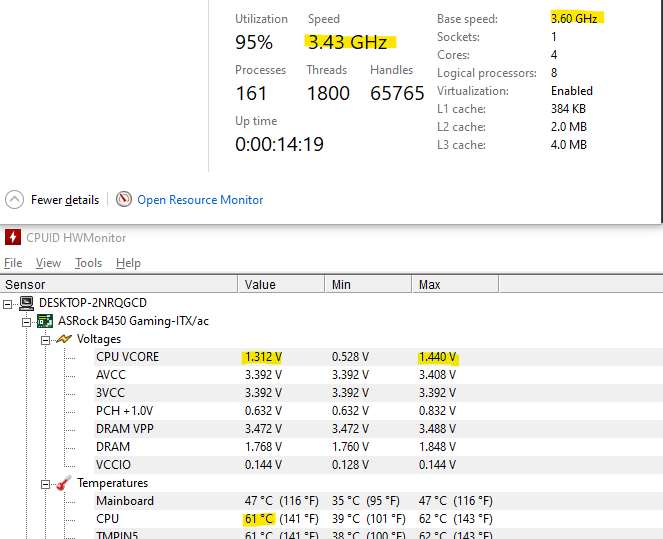
The pico PSU concerns me, since both the PSU as well as the power adapter are rated for peak output. There’s no telling what their continuous output would be, even though Ryzen 5 2400G’s peak power consumption should be much lower than their spec. So I decided to benchmark it. I ran Cinebench R20 and got a score of 1748, as well as UNIGINE Heaven (1080p, Ultra setting with 8x antialias) and got a score of 323. With an optimized fan curve, the CPU is kept pretty cool at 65°C during benchmarks, which is good. The results are close to what I got before, though slightly lower. Since the temperature was fine, I don’t believe it was thermal throttling. I suspect it may be power throttling. Using HWMonitor and Task manager, I noticed that the CPU never reached base clock during benchmark. In fact CPU voltage also never reached maximum spec. This confirms my theory that it is indeed power throttling.
The PSU also had a weird issue whereupon hitting the power button, its power LED will briefly flash, then turn off. The only way to fully power on the PC is to hold the power button for a second, then the PSU will finally power on after the initial flash. I Googled this behavior and didn’t find any definitive answers. Unfortunately, I also don’t have a voltmeter to measure the actual output of the PSU. Users on forums seem to suggest that this behavior is a sign of a defective PSU. I double-checked the PSU, and I don’t see any visual damages. I replaced it through Amazon. However the new unit still has the same issue. I figured I can live with it.
Final Thoughts
Once my build is complete, I was able to successfully boot it and install Windows 10 on it without a hitch. Overall I’m quite happy with my build. I managed to reuse my APU, RAM, and SSD, which I consider a success. My final build is pretty much as compact as it can be with some parts literally needed to be cut to fit in. It’s a miracle that everything fits in at all. If certain parts were off by even a millimeter, it wouldn’t have worked. I’m a bit surprised to learn so many quirks that I didn’t anticipate before. This was definitely a fun learning experience and I enjoyed building this thing despite the challenges. These tiny parts ended up being significantly more costly than my original plan. I ran the numbers and it ended up being about $60 USD more expensive than my original plan. That just happened to match the cost of adding a check-in luggage on a round trip.