Training Stable Diffusion Concept with LoRA on AMD GPU
Since Stable Diffusion became publicly available, I spent quite some time playing with it using stable-diffusion-webui. I downloaded a number of different models to play with and had a lot of fun while at it. However, it quickly became apparent that a model has its limits. It can only generate what it knows. The online community is extremely active in improving existing models by adding new content using DreamBooth, or mixing multiple models into cocktails of models. I was fascinated and wanted to add my own content on top of Stable Diffusion models. In my many attempts, I had varying degrees of success. So I want to share what I learned from my experience. More specifically, my quest to train a concept with LoRA on my AMD Radeon RX 6700 XT, which posed some unique challenges that I don’t believe are being discussed enough.



Why?
If you search the web, you will easily find tons of tutorial videos on how to train Stable Diffusion. However, I find most of them are focused on training subjects or styles. Eg. a particular person or a famous artist’s style. I haven’t been able to find tutorials that talk about techniques and configurations to use for training a concept, like a particular action, pose, or scene. There are also some confusing explanations on the web regarding a few important parameters, so I want to demystify them in my own words. Furthermore, I have an AMD GPU, RX 6700 XT, which I bought during the silicon shortage, so I just bought whatever was in stock for a fraction of a second. While it’s capable, it’s not great for productivity tasks like machine learning, and certainly posed a lot of obstacles. So I want to walk through the specific workflow that worked for me and for those of us, who have AMD GPUs. There are dozens of us. Dozens!
Why LoRA?
There are many ways to add new content to an existing base model. Texual inversion, hypernetworks, DreamBooth, LORA, and aesthetic embedding. They are implemented in different ways. Here is a very helpful video that explains them in depth.
The TLDR is that DreamBooth is probably the best. But it can only output a whole model at a time, which is inconvenient. A model is usually a few GB in size. LoRA is a lot like DreamBooth though it’s a different algorithm. It allows you to distribute a small file that can be selectively imported into your prompt like a portable addon. You can also build it into a model if you want. It’s faster and uses less VRAM than DreamBooth when training. Textual inversion and hypernetworks can also act like addons, but they are not as good. Aesthetic embedding is just bad, let’s ignore it. I have experimented with all of these, and my favorite is LORA. It works well and is portable. You are able to use a LoRA on most models that are trained on the same base model as long as they haven’t deviated too far. DreamBooth was a no-go for me. It immediately blows up my VRAM and I have 12GB of VRAM in my RX 6700 XT. On an NVIDIA GPU, you can use xformer and 8bit Adam optimizations, but those are not available to AMD GPU, so that’s a dead end for me.
Getting Things Started
Before we get too far, let’s start with just getting things running. Right off the bat, it’s not that straightforward, because we got an AMD GPU. You are gonna need Linux. Not because I’m a Linux fanboy (though I am), but because as of writing, PyTorch only has AMD GPU support on Linux. If you are on Windows and have AMD GPU, well, you are out of luck. Since we are talking about ML training and Linux here, so I’m gonna assume you have some basic developer knowledge. You need Git and Python 3.10. Open the terminal and navigate to somewhere you want to checkout Git repositories and clone stable-diffusion-webui. What’s important here is that we need to explicitly install the AMD ROCm build of PyTorch instead of the CUDA one, which is for NVIDIA GPU. Suppose you have Git repos under ~/git directory. Follow these steps:
cd ~/git
git clone https://github.com/AUTOMATIC1111/stable-diffusion-webui.git
cd stable-diffusion-webui
python -m venv venv # Create Python venv. I'm on Arch so python refers to Python 3. Other distros may have python3 instead
source venv/bin/activate
Now we need to install the ROCm build of PyTorch. Use this tool, and select Stable -> Pip -> Linux -> ROCm. It should give you the pip install command to install the latest ROCm build of PyTorch using pip. At the time of writing, mine looks like pip3 install torch torchvision torchaudio --extra-index-url https://download.pytorch.org/whl/rocm5.2. We don’t actually need torchaudio, so remove that and run
pip3 install torch torchvision --extra-index-url https://download.pytorch.org/whl/rocm5.2
Awesome, we have PyTorch installed, but that’s not the only quirk. I created a launch script for myself, so let’s go ahead and create one somewhere under your PATH.
#!/bin/bash
export TORCH_COMMAND='pip install torch torchvision --extra-index-url https://download.pytorch.org/whl/rocm5.2' # Make sure it's the same rocm version
export HSA_OVERRIDE_GFX_VERSION=10.3.0 # Needed to work around a quirk with HIP
cd ~/git/stable-diffusion-webui
venv/bin/python launch.py $@
You can launch stable-diffusion-webui with this launch script without source venv/bin/activate, because it uses the venv instance of python. When you launch it for the first time, it will install the rest of the dependencies. Open http://localhost:7860/ in your browser and voila! There’s the webui. At this point, you don’t have a Stable Diffusion model yet, so it’s not functional. While we are here, let’s install some extensions. For this tutorial, we are gonna train with LORA, so we need sd_dreambooth_extension. Go to Extensions tab -> Available -> Load from and search for Dreambooth. Click install next to it, and wait for it to finish. Now let’s just ctrl + c to stop the webui for now and download a model. You can find Stable Diffusion 1.5 here and 2.1 here. For this tutorial, I’m gonna use 1.5. So I have sd-v1-5-pruned.ckpt and sd-v1-5-pruned.vae.pt downloaded. In case you wonder what some of these extensions mean.
.ckptis the model file, but it has security concerns as it could allow malicious code to get in..safetensorsis also the model file but safe. It’s the sanitized version of.ckpt. Try to use.safetensorsas much as possible..vae.ptis the VAE file. VAE is meant to make some corrections to the model output. Depending on the model, it will have varying degrees of effectiveness. Some models will look desaturated without VAE, while others can be completely broken. In the webui, under Settings tab. You can select a specific VAE, auto, or none. In auto mode, it will just pick the VAE file with the same name as the model that’s selected. However, it is extremely important that we don’t load a VAE into memory while training textual inversion. It will completely mess it up. Though it appearls training LoRA on a model with built-in VAE works just fine.
Move your model as well as VAE files under ~/git/stable-diffusion-webui/models/Stable-diffusion/. Notice that there’s a separate directory just for VAE at ~/git/stable-diffusion-webui/models/VAE/. You can optionally put VAE files in there, but it will work either way.
Now start the webui again, and you should see sd-v1-5-pruned.ckpt as a selectable model in the left top corner. Feel free to play with, and make sure everything works before moving forward.
Preparation
Keep in mind that currently, the Stable Diffusion scene is moving at breakneck speed. Literally every time I run git pull there are new features, UI gets shifted around or something gets broken. Truly, move fast and break things. So the UI elements I mention here may not be the same, and some of the problems I have may have been fixed by the time you are reading. Speaking of which, to update the webui run git pull inside ~/git/stable-difffusion-webui, however, extensions are separate git repos. In order to update an extension, you need to go to one of the extension directories and git pull from there. eg. ~/git/stable-diffusion-webui/extensions/sd_dreambooth_extension/.
Let’s pick a concept that Stable Diffusion doesn’t already know for this tutorial. Turns out it knows a lot of stuff, so I had some difficulties picking something unique. But looks like it doesn’t seem to know how to shrug.

So let’s teach it to shrug. Note that even if Stable Diffusion knows about something but doesn’t generate it well or consistently, you can still train LoRA on top of it to strengthen it. I went to the internet and searched for a bunch of royalty-free images of “shrug” as training images. (Don’t sue me please.) You want to collect as many high-quality images as possible of different angles, lighting conditions, and subjects. Though you don’t need that many. For subject training, usually 20 distinct images is fine. For concept, I had pretty good success with about 30 images. We need to preprocess them first to normalize and caption them. Keep in mind that there’s a big difference between Stable Diffusion 1.5- and 2.0+. 1.5- uses 512x512px images, while 2.0+ uses 768x768px images. So if your base model is 1.5 then you need to crop and resize them to 512x512px. Otherwise, if your base model is based on 2.0+ then make sure to use 768x768px images. Conveniently the webui provides a tool to preprocess images. But before we get there, we may want to manually crop images first if the focal point is not centered, because the image preprocessor will center crop by default. It seems to have an auto focal point crop option now, but if you want to focus on a particular concept, you are better off doing it by yourself. Your crop can be pretty rough, just make sure your desired focal point is in the center and remove unrelated contents as much as you can.

In the webui, go to Train -> Preprocess images. Enter your image directory and an output directory. Make sure you select the right output resolution. Since I’m going to train on top of Stable Diffusion 1.5, so I need to use 512x512px. I usually check Create flipped copies if the sample images are highly asymmetrical and you don’t want the model to only know how to draw one side. Also, check Use BLIP for caption to auto caption images. If you are training on an anime model, check Use deepbooru for caption instead. Click Preprocess and let it do its work.
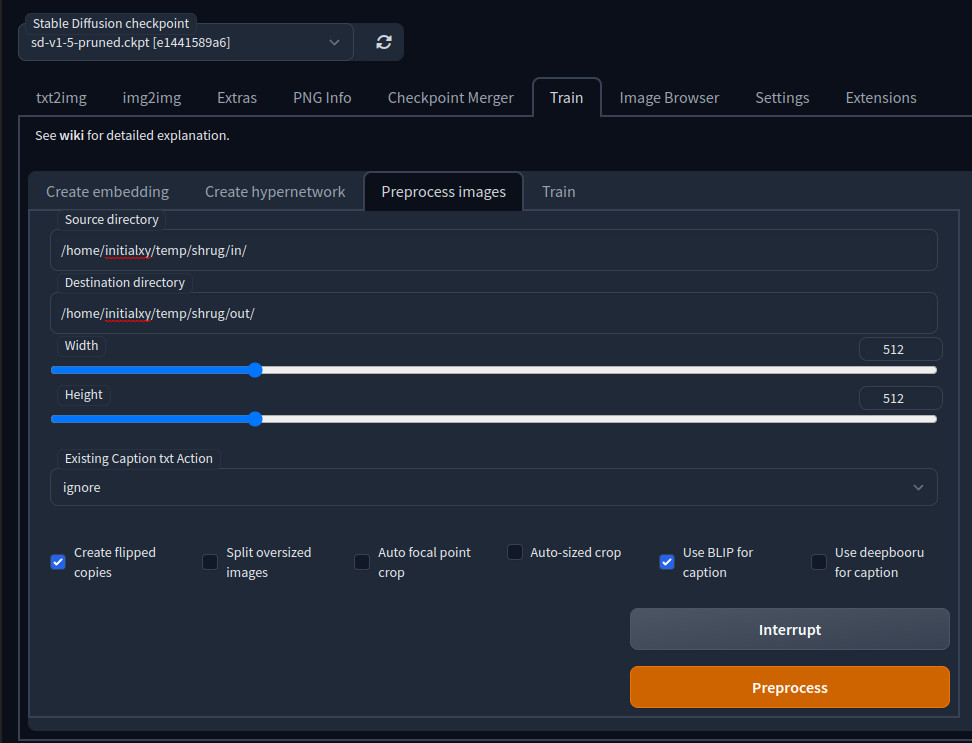
Once it finishes, go to the output directory and double check if the images are cropped in a desirable way. Feel free to delete any that you believe no longer present the focal concept well. We are ready to train.
Start Training
UPDATE I have an updated post about this.
We got our training images, so let’s get things started. Make sure to set SD VAE to none in settings, apply settings and restart the webui before continueing. Go to the DreamBooth tab and create a new model first. Let’s simply call it “shrug”. Select sd-v1-5-pruned.ckpt as base model and make sure 512x is selected and hit Create Model. Now a “shrug” model should be created and make sure it’s selected in the left side pane.
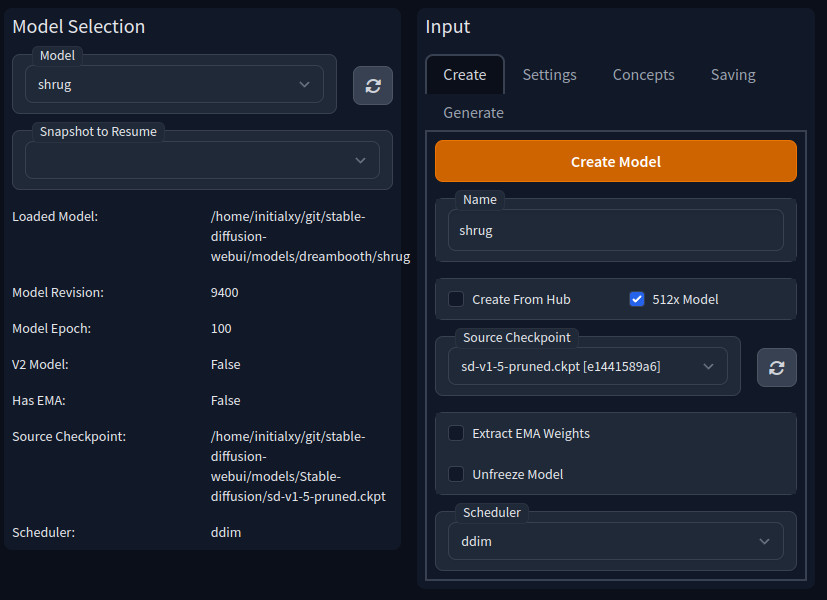
Go to Settings and we need to make some changes.
- Check Use LORA
- Set Save Model Frequency (Epochs) to 10 and Save Preview(s) Frequency (Epochs) to 10. This means for every 10 epochs, it will try to generate sample images and save a version of the model. Since we are leaving Training Steps Per Image (Epochs) at 100, this means a checkpoint will be saved for every 10% of progress.
- For Learning Rate Scheduler let’s change it to polynomial and leave the default settings. Note that at Polynomial Power of 1, it’s actually a straight line, hence no different than linear. but it works for me and you can experiment with a larger value to make it curve. Learning rate is important. Let’s talk about it a bit. An aggressive learning rate means it will learn faster, but it won’t fit the desired concept well. A fine learning rate means it will more finely fit the model to its desired concept, but it will run slower. Here, we are using a learning rate scheduler to aggressively fit the model at the start then gradually dialing it down. We also need to avoid overfitting the model. This happens when the model was trained too much such that it became too tightly wrapped around some small details. In the case of Stable Diffusion, images will start to look harsher and eventually turns into complete garbage. An overfitted model also tends to be less flexible, making it less capable of mixing with other concepts. That’s why we want to generate sample images and checkpoints of the model as it trains every 10 epochs, so we can see how well it’s going. Our goal is not to simply use the most trained version, but to pick a version that has the best balance between correctly representing our concept and flexibility.
- For Sanity Sample Prompt enter a sample prompt that will be used to generate one of the two sample images during training. For me, I entered “photo of a man (shrug)”. (Using parenthesis for emphasis here.)
- Open Advanced -> Mixed precison. Let’s use fp16 to save VRAM.
- Keep Clip Skip at 1. It should only be set to 2 when you are training on top of Novel AI or Novel AI based models. Otherwise, it should always be 1.
- Under Concepts tab, let’s use one concept here. Hit Training Wizard (Object/Style) to get some presets, Enter your training image directory to Dataset Directory
- Instance Token should be “shrug” (without quotes)
- Instance Prompt should be “shrug, [filewords]” and the same for Sample Image Prompt (without quotes). [filewords] means the prompt will be pulled from each training image’s associated caption file that was generated by BLIP earlier. So if an image’s caption is “a man in a brown shirt” then “shrug, [filewords]” expands it to “shrug, a man in a brown shirt”. Since we put it into Sample Image Prompt, that’s the prompt that will be selected to generate the second sample image during training. You may want to know what are Classification Dataset Directory, Class Token, and class prompt. This is the part that I feel is very poorly explained on the internet and often explained in a confusing way. So I will try to explain a bit more later based on my own understanding reading the documentation and experiments. Let’s move on.
- Under Saving tab, check Generate LoRA weights when saving during training. So it will actually save checkpoints during training.
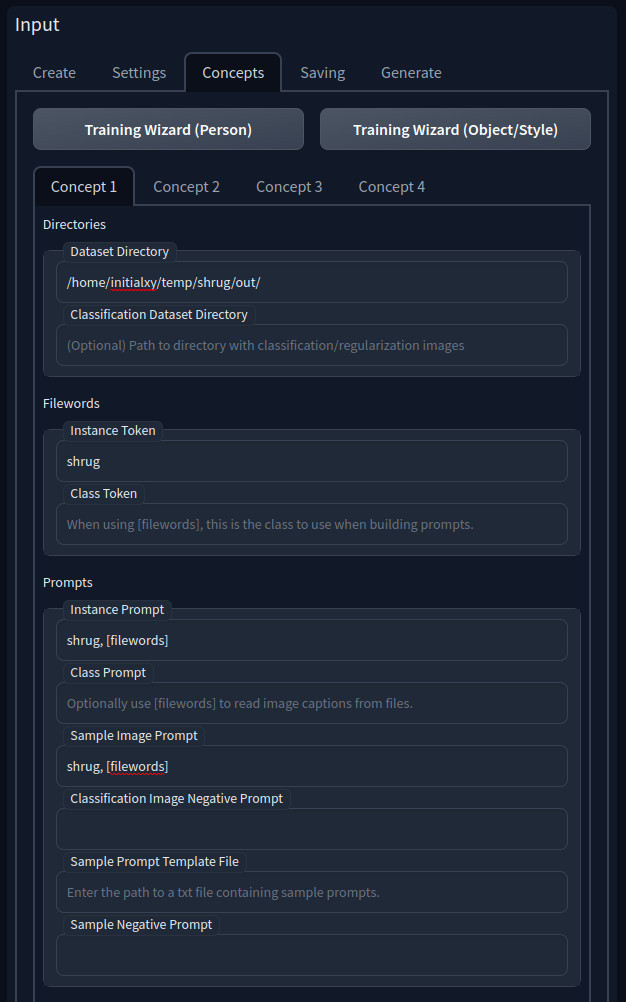
Here are my full settings as db_config.json. So what are classification dataset directory, class token, and class prompts? Something to keep in mind is that DreamBooth and LoRA tend to finetune concepts related to our focal point as well, which could become an undesirable side effect. For instance, if a prompt was “a man posing, shrug”, then it will end up making all “posing” or “man” look like shrug even when not prompted for “shrug”. So classification dataset directory, class token, and class prompts are used to indicate a “class” of things that should avoid being polluted by training. So in the above example, we’d want to enter “posing” in class prompt. Instance Token and Class Token fields on their own don’t do anything. They are used to look for keywords in Instance Prompt and Class Prompt that can be identified as instance or class words once [filewords] are expanded. Effectively, Instance Token are a list of “trigger words” for this concept while Class Token are a list of related concepts that you want to avoid polluting. But these words are only respected when the expanded prompts contain them. The rest of the prompt that’s neither instance nor class tokens could still be affected by training and associate context to the concept. Classification Dataset Directory is meant to contain a set of training images for class prompts. Ideally, it should be the original training images used to train the base model. But if you don’t have them, some images will be generated for you before training starts based on the training images’ class prompts. The amount generated is configured by Class Images Per Instance Image. Class prompt is particularly important because DreamBooth and LoRA could be built into a model. So you really don’t want a generic concept to all look like a specific sample. However since we are trying to train a LoRA concept as an addon, so this doesn’t matter all that much, because we are going to explicitly import it when we need it. That’s why we left them blank. This means it would be a bad idea to build the LoRA we are about to train into a model. As far as I understand, this is the biggest difference between subject and concept training. If you are training for a person or character, you will want to be more cautious with class prompts and images.
We are all ready to go. Now let’s hit Train and go get lunch.
Testing
When it’s done, you should find a list of sample images created every 10 epochs at ~/git/stable-diffusion-webui/models/dreambooth/shrug/samples/. You should also find a list of checkpoints at ~/git/stable-diffusion-webui/models/lora/ (lower case lora, because there’s also an uppercase Lora, where you drop LoRAs that you want to use). As I mentioned above, our goal is to find a checkout that looks the best. Taking a look at mine, it seems most of them are overfitting. In fact, some of them look downright scary. So I picked the lower ones: 1880, 2820, and 3760 for further testing.
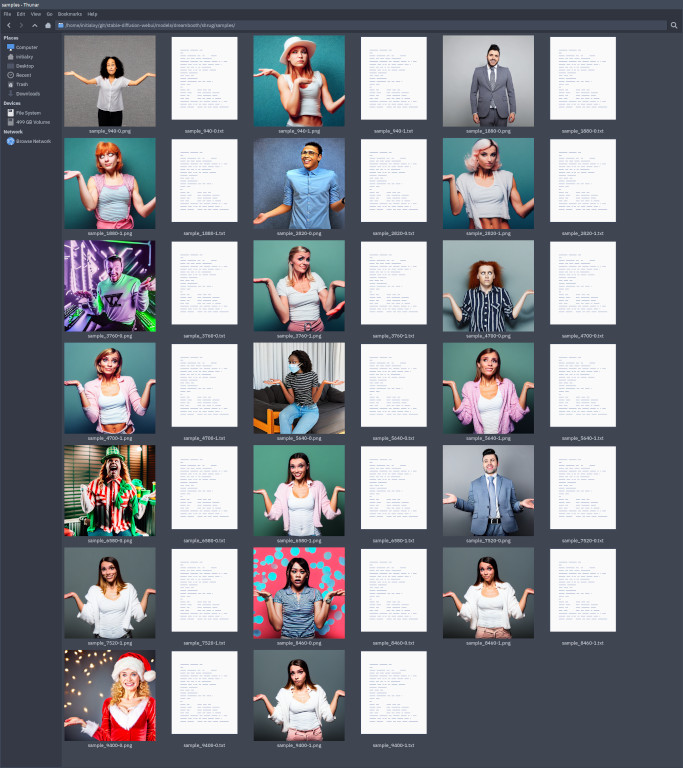
Here is a really quirky part of all this. As of writing, those .pt files generated by sd_dreambooth_extension do not work with stable-diffusion-webui. So our only option is to generate a full model per each checkpoint and use them instead. Under DreamBooth tab, left side pane, select “shrug” as the model. Refresh Lora Model and select “shrug_1880.pt”. Hit Generate Ckpt at the top. It should have generated a .ckpt file under ~/git/stable-diffusion-webui/models/Stable-diffusion/shrug/. Here comes another bug. The generated .ckpt file is always named shrug_9400_lora.ckpt. Fortunately, this is just a bug with the output file name. So rename it to shrug_1880_lora.ckpt. Hopefully by the time you are reading this, they already fixed it. Do the same for 2820 and 3760.
Go to txt2img tab and refresh Stable Diffusion checkpoint in the left top corner. You should be able to select shrug/shrug_1880_lora.ckpt etc as the model. Go to Settings and use sd-v1-5-pruned.vae.pt as SD VAE. Now play around with each version to see which one works best. To me, I feel 3760 is still too strong. Their eyes creep me out.



So I decided to extract 1880 and 2820 for further testing. Here we run into yet another problem. We have our LoRAs in model .ckpt files, but how do we get them out of it? Thankfully, it’s pointed out in its Github issue that another project, kohya_ss is able to extract LoRA out of a model file. Let’s git clone https://github.com/bmaltais/kohya_ss.git and similarly create Python venv and install its dependencies. But wait, don’t bother launching it, because kohya_ss really only works on Windows with NVIDIA CUDA. It has tons of hardcoded Windows path separator (\) in its code and there’s just no hope of running it on Linux. Fortunately, we don’t have to, because we are only interested in extracting LoRAs from model files. We only need its extract_lora_from_models.py, which unfortunately uses TensorFlow that only works with NVIDIA CUDA. Fear not, we have not hit a dead end yet. We can force TensorFlow to run in CPU mode. It will be slow, but since we are asking for a pretty simple task, it will finish in a minute or so. In order to force TensorFlow to run in CPU mode. Run accelerate config and select CPU mode, then you also need to set two environment variables CUDA_DEVICE_ORDER=PCI_BUS_ID, CUDA_VISIBLE_DEVICES=-1. I wrapped it up in an extract_lora script.
#!/bin/bash

export CUDA_DEVICE_ORDER=PCI_BUS_ID
export CUDA_VISIBLE_DEVICES=-1

~/git/kohya_ss/venv/bin/python ~/git/kohya_ss/networks/extract_lora_from_models.py --save_precision fp16 --save_to "$3" --model_org "$2" --model_tuned "$1" --dim 8
It needs three arguments: LoRA model, base model and output file. eg.
./extract_lora ~/git/stable-diffusion-webui/models/Stable-diffusion/shrug/shrug_1880_lora.ckpt ~/git/stable-diffusion-webui/models/Stable-diffusion/sd-v1-5-pruned.ckpt ~/git/stable-diffusion-webui/models/Lora/cc_shrug_2820.ckpt
Make sure you kill stable-diffusion-webui before running this to avoid going out of memory. I have 32GB of RAM and it gets blown up quickly.
Using LoRAs
Notice we dropped the output into the ~/git/stable-diffusion-webui/models/Lora/ directory. (Upper case Lora.) This is where LoRAs will get picked up by the webui. Launch the webui again and switch the model to the base sd-v1-5-pruned.ckpt. Click on Show extra networks icon under Generate. Navigate to LoRA and Refresh. You should see your newly created LoRAs there. You can even set a thumbnail for each LORA.
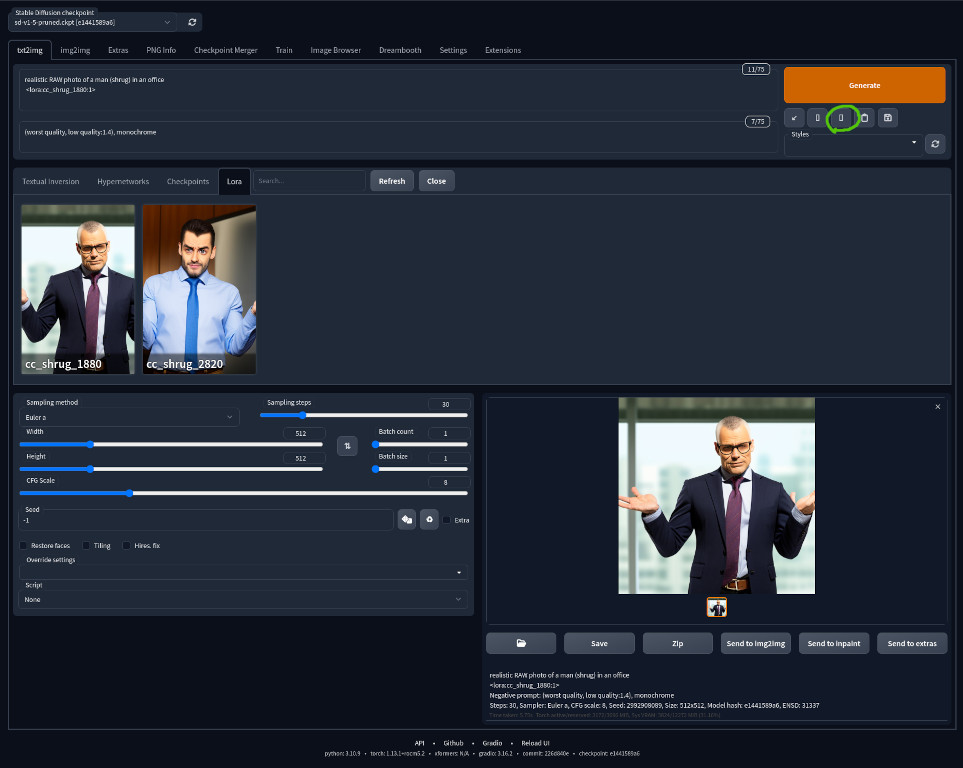
Click on one of the LoRAs and notice that inserts <lora:cc_shrug_1880:1> into your prompt. This is how a LoRA is imported and you can import multiple of them if you’d like. The number after comma : indicates its strength. You can set it to a smaller number to make it weaker eg. <lora:cc_shrug_1880:0.5>. This is especially useful when you are combining multiple LoRAs and they tend to fight over each other. Remember to enter the rest of the prompt to describe a scene and our trigger word “shrug”. Ultimately, I think 1880 works the best overall, so that’s the version I decided to keep. A cool property of LoRA is that it can be used on most models that are based on the same based models as long as they have not drifted too far away. So most Stable Diffusion 1.5 based model should be able to use the shrug LoRA that we created today. You can convert your .ckpt file to .safetensors under the Checkpoint Merger tab. Check No interpolation and safetensors then hit Merge. You have to move your LoRA .cpkt files under ~/git/stable-diffusion-webui/models/Stable-diffusion/ directory for the webui to find it.

